Just like mastering the art of a perfect key turn, we’re here to help you unlock the mystery of resetting your door keypad.
We’ve got the know-how and we’ll be laying out clear, concise steps for you. So whether it’s a glitch or just time for an update, don’t worry – we’ve got your back!
Together, let’s ensure your door keypad is always in top-notch condition.
Understanding the Function of Your Door Keypad
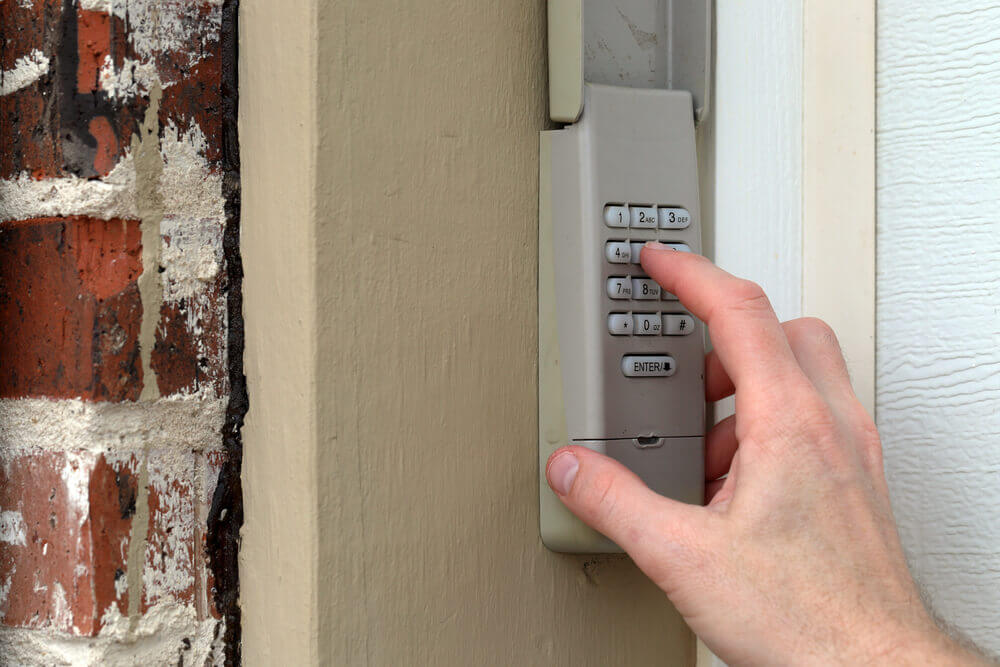
Before we dive into resetting your Liftmaster, it’s vital to understand what your door keypad actually does. This small yet innovative gadget is your key to operating the door opener without having to use a remote control or manual switch. It offers convenience, security, and smart control at your fingertips.
The door keypad functions as a remote transmitter that sends signals to your door opener. When you punch in the correct code on the keypad, it transmits a signal to the door opener, prompting it to open or close the door. It’s primarily intended for wireless operation of your garage system during instances where traditional keys are not available or practical.
Understanding this functionality is crucial when troubleshooting issues with your keypad or attempting any reset process. You see, knowing how it communicates with the rest of the system gives us an edge in diagnosing potential problems accurately and swiftly.
So now that we’ve grasped its purpose and functionality, let’s move towards exploring how we can effectively reset our door keypads when necessary – ensuring seamless operation of our sophisticated home automation tools.
Identifying the Type of Door Keypad You Have for Your Garage Door Opener
You’ll need to figure out what model you’re working with before you can proceed. In our experience, identifying the type of door keypad can expedite the process and make it more efficient. We’ve found that most keypads fall into one of three categories: wireless, hardwired, or smartphone enabled.
Firstly, wireless keypads function by transmitting radio signals directly to your door opener. They’re often battery-powered and require a specific code for operation.
Secondly, hardwired keypads are physically connected to your garage door opener through electrical wiring. These tend to be highly reliable due to their direct connection but can be slightly more difficult to reset.
Finally, smartphone-enabled keypads leverage modern technology by allowing homeowners to control their garage doors using mobile apps. These offer the convenience of resetting from anywhere in the world.
We’ll guide you through the steps for each type but remember that knowing your model is pivotal for a successful reset. It’s about embracing innovation and making it work effectively within our daily lives—let’s turn this challenge into an opportunity together.
Necessary Tools and Safety Measures for Keypad Reset
In order to begin, it’s essential that you gather the right tools and familiarize yourself with safety measures. We’ll need a ladder, soft cloth, alkaline batteries, flat-head screwdriver, and your keypad’s instruction manual.
Let’s ensure safety first. When using the ladder, make sure it’s stable before climbing up. Don’t overreach; if you can’t reach comfortably, get down and move the ladder. Always keep one hand on the ladder for balance.
Next is tool handling. Use the soft cloth to clean any dirt or grime off of your keypad before beginning – this prevents any foreign matter from interfering in our resetting process. The screwdriver will be used to open the battery compartment if necessary; remember not to use excessive force as this could damage your keypad.
The most pivotal piece we have is your keypad’s instruction manual which will guide us through the specific resetting process for your model. If missing it, don’t worry! We can locate a digital copy online with a swift Google search using your model number.
Armed with these tools and guidelines, we’re fully prepared to reset our door keypad in an innovative way ensuring optimal performance post-resetting!
Step-by-Step Guide to Reset Your Garage Door Keypad
Let’s now dive into the step-by-step guide to reprogram your access device for smoother operation.
Our first order of business is locating the Learn or Program button on your garage door motor unit. It’s typically found at the back and can be either red, yellow, green, or purple.
Once you’ve located it, press the learn button and hold until the indicator light starts blinking. This triggers the programming mode in your device.
Now let’s move onto resetting your keypad code. Enter a 4-digit temporary pin code of your choice on the keypad while the indicator light is still blinking.
After keying in your desired code, hit the Enter button to lock it in place. The keypad will blink rapidly or beep to confirm that you’ve successfully updated its memory with a new pin code.
Finally, we’ll test our work by entering the newly set access code into our keypad followed by pressing enter once more. If done right, this should immediately trigger a response from your garage door – either opening or closing depending on its state before initiating this process.
And voila! We’ve innovatively navigated through resetting our door keypad with minimal fuss and maximum efficiency!
Troubleshooting Common Issues as You Change a Garage Door Code
Despite our best efforts, there might be instances where things don’t go as planned and we encounter a few stumbling blocks during the reprogramming process. This can be frustrating, but we’ve got some troubleshooting tips that should help you get back on track in no time.
Here are some common issues:
Keypad not responding
– Ensure the keypad is properly powered. Check for any signs of battery depletion.
– Perform a factory reset if the problem persists.
Incorrect code input
– Be sure you’re entering the correct security code.
– If forgotten, refer to your user manual or contact customer support.
Remember, technical glitches are inevitable when dealing with advanced technology like digital garage door keypads. We must stay patient and meticulously follow all guidelines to ensure smooth functioning.
We’re pushing boundaries together by embracing innovative solutions for everyday problems. Let’s continue learning and adapting because curiosity drives innovation!
Maintenance Tips for Your Door Keypad
You’ve got to regularly clean and inspect your entry system for it to function optimally. That’s a given in our book. Dirt, dust, and grime can interfere with the keypad’s functionality, leading to frustrating malfunctions or erroneous entries.
To perform this routine maintenance, we recommend using a soft-bristle brush or canned air to gently remove any debris from the keypad surface. For stubborn grime, use a lightly dampened cloth with mild soap—avoiding harsh chemicals that could damage delicate components.
Next up on our agenda is battery upkeep. We’re pretty sure you don’t want to be left out in the cold because of low power levels! Regularly check the battery level and replace as necessary. Trust us—it’ll save you headaches down the line.
Lastly, don’t forget firmware updates! These not only ensure optimal performance but also often add improved features or fix known bugs. It’s cutting-edge technology right at your fingertips!
Keep these pointers in mind as you maintain your door keypad system—we guarantee they’ll make all the difference between an entry system that simply works versus one that performs flawlessly every time!
When to Seek Professional Help for Door Keypad Issues
While it’s important to perform regular maintenance, there’ll be times when professional intervention is necessary to resolve certain issues with your entry system. For instance, if you’re unable to reset your door keypad despite following all the recommended troubleshooting steps, it’s time we call in a pro.
We understand that you’re an innovator and love DIY solutions; however, dealing with complex access control systems like keypads involves intricate electronic components. Mishandling them can lead to further complications or even void your warranty. Professionals have specialized tools and knowledge of various keypad models, allowing for targeted problem-solving.
If the keypad isn’t responding at all or showing signs of physical damage—like cracked keys—it’s another case where expert help becomes indispensable. They will assess whether a repair or full replacement is needed.
Remember, safety is paramount. If your garage door isn’t closing properly due to a malfunctioning keypad, don’t ignore it! This could pose serious security risks.
Innovation includes knowing when to delegate tasks beyond our expertise level. We believe in smart decision-making; sometimes that means letting professionals take the reins on advanced technical issues.
Conclusion
In wrapping up, we’ve sailed through the sea of resetting your garage door keypad. This critical knowledge keeps your home secure and saves on costly repairs.
We’ve grappled with identifying keypads, necessary tools, safety measures, and troubleshooting common issues. Regular maintenance is key!
But remember, when the waters get too rough to navigate alone, don’t hesitate to seek professional help. Keep your ship sailing smoothly!